이제
Service & AWS LoadBalancer Controller에 대해 알아보겠습니다.
서비스 종류는 총 4가지 입니다.
ClusterIP 타입

NodePort 타입

LoadBalancer 타입 (기본 모드) : NLB 인스턴스 유형

Service (LoadBalancer Controller) : AWS Load Balancer Controller + NLB IP 모드 동작 with AWS VPC CNI

NLB 모드 전체 정리
- 인스턴스 유형
- externalTrafficPolicy : ClusterIP ⇒ 2번 분산 및 SNAT으로 Client IP 확인 불가능 ← LoadBalancer 타입 (기본 모드) 동작
- externalTrafficPolicy : Local ⇒ 1번 분산 및 ClientIP 유지, 워커 노드의 iptables 사용함
- 상세 설명요약 : 외부 클라이언트가 '로드밸런서' 접속 시 부하분산 되어 노드 도달 후 iptables 룰로 목적지 파드와 통신됨!
- 노드는 외부에 공개되지 않고 로드밸런서만 외부에 공개되어, 외부 클라이언트는 로드밸랜서에 접속을 할 뿐 내부 노드의 정보를 알 수 없다
- 로드밸런서가 부하분산하여 파드가 존재하는 노드들에게 전달한다, iptables 룰에서는 자신의 노드에 있는 파드만 연결한다 (externalTrafficPolicy: local)
- DNAT 2번 동작 : 첫번째(로드밸런서 접속 후 빠져 나갈때), 두번째(노드의 iptables 룰에서 파드IP 전달 시)
- 외부 클라이언트 IP 보존(유지) : AWS NLB 는 타켓이 인스턴스일 경우 클라이언트 IP를 유지, iptables 룰 경우도 externalTrafficPolicy 로 클라이언트 IP를 보존
- IP 유형 ⇒ 반드시 AWS LoadBalancer 컨트롤러 파드 및 정책 설정이 필요함!
- Proxy Protocol v2 비활성화 ⇒ NLB에서 바로 파드로 인입, 단 ClientIP가 NLB로 SNAT 되어 Client IP 확인 불가능
- Proxy Protocol v2 활성화 ⇒ NLB에서 바로 파드로 인입 및 ClientIP 확인 가능(→ 단 PPv2 를 애플리케이션이 인지할 수 있게 설정 필요)링크
AWS LoadBalancer Controller 배포 with IRSA - 링크
AWS Load Balancer Controller 추가 기능 설치 - Amazon EKS
배포된 차트는 보안 업데이트를 자동으로 수신하지 않습니다. 새 차트가 사용 가능해지면 수동으로 업그레이드해야 합니다. 업그레이드 시 이전 명령에서 install을 upgrade로 변경하되, 이전 명령
docs.aws.amazon.com
# OIDC 확인
aws eks describe-cluster --name $CLUSTER_NAME --query "cluster.identity.oidc.issuer" --output text
aws iam list-open-id-connect-providers | jq

# IAM Policy (AWSLoadBalancerControllerIAMPolicy) 생성
curl -O https://raw.githubusercontent.com/kubernetes-sigs/aws-load-balancer-controller/v2.5.4/docs/install/iam_policy.json
aws iam create-policy --policy-name AWSLoadBalancerControllerIAMPolicy --policy-document file://iam_policy.json

# 혹시 이미 IAM 정책이 있지만 예전 정책일 경우 아래 처럼 최신 업데이트 할 것
# aws iam update-policy ~~~

# 생성된 IAM Policy Arn 확인
aws iam list-policies --scope Local | jq
aws iam get-policy --policy-arn arn:aws:iam::$ACCOUNT_ID:policy/AWSLoadBalancerControllerIAMPolicy | jq
aws iam get-policy --policy-arn arn:aws:iam::$ACCOUNT_ID:policy/AWSLoadBalancerControllerIAMPolicy --query 'Policy.Arn'

# AWS Load Balancer Controller를 위한 ServiceAccount를 생성 >> 자동으로 매칭되는 IAM Role 을 CloudFormation 으로 생성됨!
# IAM 역할 생성. AWS Load Balancer Controller의 kube-system 네임스페이스에 aws-load-balancer-controller라는 Kubernetes 서비스 계정을 생성하고 IAM 역할의 이름으로 Kubernetes 서비스 계정에 주석을 답니다
eksctl create iamserviceaccount --cluster=$CLUSTER_NAME --namespace=kube-system --name=aws-load-balancer-controller --role-name AmazonEKSLoadBalancerControllerRole \
--attach-policy-arn=arn:aws:iam::$ACCOUNT_ID:policy/AWSLoadBalancerControllerIAMPolicy --override-existing-serviceaccounts --approve

## IRSA 정보 확인
eksctl get iamserviceaccount --cluster $CLUSTER_NAME

## 서비스 어카운트 확인
kubectl get serviceaccounts -n kube-system aws-load-balancer-controller -o yaml | yh

# Helm Chart 설치
helm repo add eks https://aws.github.io/eks-charts
helm repo update
helm install aws-load-balancer-controller eks/aws-load-balancer-controller -n kube-system --set clusterName=$CLUSTER_NAME \
  --set serviceAccount.create=false --set serviceAccount.name=aws-load-balancer-controller

## 설치 확인 : aws-load-balancer-controller:v2.7.1
kubectl get crd
kubectl get deployment -n kube-system aws-load-balancer-controller
kubectl describe deploy -n kube-system aws-load-balancer-controller
kubectl describe deploy -n kube-system aws-load-balancer-controller | grep 'Service Account'
  Service Account:  aws-load-balancer-controller

# 클러스터롤, 롤 확인
kubectl describe clusterrolebindings.rbac.authorization.k8s.io aws-load-balancer-controller-rolebinding
kubectl describe clusterroles.rbac.authorization.k8s.io aws-load-balancer-controller-role
...
PolicyRule:
  Resources                                     Non-Resource URLs  Resource Names  Verbs
  ---------                                     -----------------  --------------  -----
  targetgroupbindings.elbv2.k8s.aws             []                 []              [create delete get list patch update watch]
  events                                        []                 []              [create patch]
  ingresses                                     []                 []              [get list patch update watch]
  services                                      []                 []              [get list patch update watch]
  ingresses.extensions                          []                 []              [get list patch update watch]
  services.extensions                           []                 []              [get list patch update watch]
  ingresses.networking.k8s.io                   []                 []              [get list patch update watch]
  services.networking.k8s.io                    []                 []              [get list patch update watch]
  endpoints                                     []                 []              [get list watch]
  namespaces                                    []                 []              [get list watch]
  nodes                                         []                 []              [get list watch]
  pods                                          []                 []              [get list watch]
  endpointslices.discovery.k8s.io               []                 []              [get list watch]
  ingressclassparams.elbv2.k8s.aws              []                 []              [get list watch]
  ingressclasses.networking.k8s.io              []                 []              [get list watch]
  ingresses/status                              []                 []              [update patch]
  pods/status                                   []                 []              [update patch]
  services/status                               []                 []              [update patch]
  targetgroupbindings/status                    []                 []              [update patch]
  ingresses.elbv2.k8s.aws/status                []                 []              [update patch]
  pods.elbv2.k8s.aws/status                     []                 []              [update patch]
  services.elbv2.k8s.aws/status                 []                 []              [update patch]
  targetgroupbindings.elbv2.k8s.aws/status      []                 []              [update patch]
  ingresses.extensions/status                   []                 []              [update patch]
  pods.extensions/status                        []                 []              [update patch]
  services.extensions/status                    []                 []              [update patch]
  targetgroupbindings.extensions/status         []                 []              [update patch]
  ingresses.networking.k8s.io/status            []                 []              [update patch]
  pods.networking.k8s.io/status                 []                 []              [update patch]
  services.networking.k8s.io/status             []                 []              [update patch]
  targetgroupbindings.networking.k8s.io/status  []                 []              [update patch]
서비스/파드 배포 테스트 with NLB - 링크 NLB
Network load balancing on Amazon EKS - Amazon EKS
If you're load balancing to IPv6 Pods, add the following annotation. You can only load balance over IPv6 to IP targets, not instance targets. Without this annotation, load balancing is over IPv4. service.beta.kubernetes.io/aws-load-balancer-ip-address-type
docs.aws.amazon.com
# 모니터링
watch -d kubectl get pod,svc,ep

# 작업용 EC2 - 디플로이먼트 & 서비스 생성
curl -s -O https://raw.githubusercontent.com/gasida/PKOS/main/2/echo-service-nlb.yaml
cat echo-service-nlb.yaml | yh
kubectl apply -f echo-service-nlb.yaml

# 확인
kubectl get deploy,pod
kubectl get svc,ep,ingressclassparams,targetgroupbindings
kubectl get targetgroupbindings -o json | jq

# (옵션) 빠른 실습을 위해서 등록 취소 지연(드레이닝 간격) 수정 : 기본값 300초
vi echo-service-nlb.yaml
..
apiVersion: v1
kind: Service
metadata:
  name: svc-nlb-ip-type
  annotations:
    service.beta.kubernetes.io/aws-load-balancer-nlb-target-type: ip
    service.beta.kubernetes.io/aws-load-balancer-scheme: internet-facing
    service.beta.kubernetes.io/aws-load-balancer-healthcheck-port: "8080"
    service.beta.kubernetes.io/aws-load-balancer-cross-zone-load-balancing-enabled: "true"
    service.beta.kubernetes.io/aws-load-balancer-target-group-attributes: deregistration_delay.timeout_seconds=60
...
:wq!
kubectl apply -f echo-service-nlb.yaml

# AWS ELB(NLB) 정보 확인
aws elbv2 describe-load-balancers | jq
aws elbv2 describe-load-balancers --query 'LoadBalancers[*].State.Code' --output text
ALB_ARN=$(aws elbv2 describe-load-balancers --query 'LoadBalancers[?contains(LoadBalancerName, `k8s-default-svcnlbip`) == `true`].LoadBalancerArn' | jq -r '.[0]')
aws elbv2 describe-target-groups --load-balancer-arn $ALB_ARN | jq
TARGET_GROUP_ARN=$(aws elbv2 describe-target-groups --load-balancer-arn $ALB_ARN | jq -r '.TargetGroups[0].TargetGroupArn')
aws elbv2 describe-target-health --target-group-arn $TARGET_GROUP_ARN | jq
{
  "TargetHealthDescriptions": [
    {
      "Target": {
        "Id": "192.168.2.153",
        "Port": 8080,
        "AvailabilityZone": "ap-northeast-2b"
      },
      "HealthCheckPort": "8080",
      "TargetHealth": {
        "State": "initial",
        "Reason": "Elb.RegistrationInProgress",
        "Description": "Target registration is in progress"
      }
    },
...

# 웹 접속 주소 확인
kubectl get svc svc-nlb-ip-type -o jsonpath={.status.loadBalancer.ingress[0].hostname} | awk '{ print "Pod Web URL = http://"$1 }'

# 파드 로깅 모니터링
kubectl logs -l app=deploy-websrv -f

# 분산 접속 확인
NLB=$(kubectl get svc svc-nlb-ip-type -o jsonpath={.status.loadBalancer.ingress[0].hostname})
curl -s $NLB
for i in {1..100}; do curl -s $NLB | grep Hostname ; done | sort | uniq -c | sort -nr
  52 Hostname: deploy-echo-55456fc798-2w65p
  48 Hostname: deploy-echo-55456fc798-cxl7z

# 지속적인 접속 시도 : 아래 상세 동작 확인 시 유용(패킷 덤프 등)
while true; do curl -s --connect-timeout 1 $NLB | egrep 'Hostname|client_address'; echo "----------" ; date "+%Y-%m-%d %H:%M:%S" ; sleep 1; done
확인

nlb접속해보기
- 주소확인

- 접속

curl 날려보기

AWS NLB의 대상 그룹 확인 : IP를 확인해보자
파드 2개 → 1개 → 3개 설정 시 동작 : auto discovery ← 어떻게 가능할까?
# (신규 터미널) 모니터링
while true; do aws elbv2 describe-target-health --target-group-arn $TARGET_GROUP_ARN --output text; echo; done

# 작업용 EC2 - 파드 1개 설정
kubectl scale deployment deploy-echo --replicas=1

# 확인
kubectl get deploy,pod,svc,ep
curl -s $NLB
for i in {1..100}; do curl -s --connect-timeout 1 $NLB | grep Hostname ; done | sort | uniq -c | sort -nr

# 작업용 EC2 - 파드 3개 설정
kubectl scale deployment deploy-echo --replicas=3

# 확인 : NLB 대상 타켓이 아직 initial 일 때 100번 반복 접속 시 어떻게 되는지 확인해보자!
kubectl get deploy,pod,svc,ep
curl -s $NLB
for i in {1..100}; do curl -s --connect-timeout 1 $NLB | grep Hostname ; done | sort | uniq -c | sort -nr

#
kubectl describe deploy -n kube-system aws-load-balancer-controller | grep -i 'Service Account'
  Service Account:  aws-load-balancer-controller

# [AWS LB Ctrl] 클러스터 롤 바인딩 정보 확인
kubectl describe clusterrolebindings.rbac.authorization.k8s.io aws-load-balancer-controller-rolebinding

# [AWS LB Ctrl] 클러스터롤 확인
kubectl describe clusterroles.rbac.authorization.k8s.io aws-load-balancer-controller-role
Ingress
클러스터 내부의 서비스(ClusterIP, NodePort, Loadbalancer)를 외부로 노출(HTTP/HTTPS) - Web Proxy 역할
AWS Load Balancer Controller + Ingress (ALB) IP 모드 동작 with AWS VPC CNI

서비스/파드 배포 테스트 with Ingress(ALB) - ALB
Application load balancing on Amazon EKS - Amazon EKS
If you're load balancing to IPv6 Pods, add the following annotation to your ingress spec. You can only load balance over IPv6 to IP targets, not instance targets. Without this annotation, load balancing is over IPv4. alb.ingress.kubernetes.io/ip-address-ty
docs.aws.amazon.com
# 게임 파드와 Service, Ingress 배포
curl -s -O https://raw.githubusercontent.com/gasida/PKOS/main/3/ingress1.yaml
cat ingress1.yaml | yh
kubectl apply -f ingress1.yaml

# 모니터링
watch -d kubectl get pod,ingress,svc,ep -n game-2048

# 생성 확인
kubectl get-all -n game-2048
kubectl get ingress,svc,ep,pod -n game-2048
kubectl get targetgroupbindings -n game-2048
NAME                               SERVICE-NAME   SERVICE-PORT   TARGET-TYPE   AGE
k8s-game2048-service2-e48050abac   service-2048   80             ip            87s

# ALB 생성 확인
aws elbv2 describe-load-balancers --query 'LoadBalancers[?contains(LoadBalancerName, `k8s-game2048`) == `true`]' | jq
ALB_ARN=$(aws elbv2 describe-load-balancers --query 'LoadBalancers[?contains(LoadBalancerName, `k8s-game2048`) == `true`].LoadBalancerArn' | jq -r '.[0]')
aws elbv2 describe-target-groups --load-balancer-arn $ALB_ARN
TARGET_GROUP_ARN=$(aws elbv2 describe-target-groups --load-balancer-arn $ALB_ARN | jq -r '.TargetGroups[0].TargetGroupArn')
aws elbv2 describe-target-health --target-group-arn $TARGET_GROUP_ARN | jq

# Ingress 확인
kubectl describe ingress -n game-2048 ingress-2048
kubectl get ingress -n game-2048 ingress-2048 -o jsonpath="{.status.loadBalancer.ingress[*].hostname}{'\n'}"

# 게임 접속 : ALB 주소로 웹 접속
kubectl get ingress -n game-2048 ingress-2048 -o jsonpath={.status.loadBalancer.ingress[0].hostname} | awk '{ print "Game URL = http://"$1 }'

# 파드 IP 확인
kubectl get pod -n game-2048 -owide
확인


파드 3개로 증가시키기
# 터미널1
watch kubectl get pod -n game-2048
while true; do aws elbv2 describe-target-health --target-group-arn $TARGET_GROUP_ARN --output text; echo; done

# 터미널2 : 파드 3개로 증가
kubectl scale deployment -n game-2048 deployment-2048 --replicas 3
감소
# 터미널2 : 파드 1개로 감소
kubectl scale deployment -n game-2048 deployment-2048 --replicas 1
리소스 삭제
kubectl delete ingress ingress-2048 -n game-2048
kubectl delete svc service-2048 -n game-2048 && kubectl delete deploy deployment-2048 -n game-2048 && kubectl delete ns game-2048
ExternalDNS
K8S 서비스/인그레스 생성 시 도메인을 설정하면, AWS(Route 53), Azure(DNS), GCP(Cloud DNS) 에 A 레코드(TXT 레코드)로 자동 생성/삭제
- ExternalDNS CTRL 권한 주는 방법 3가지 : Node IAM Role, Static credentials, IRSA

AWS Route 53 정보 확인 & 변수 지정
# 자신의 도메인 변수 지정 : 소유하고 있는 자신의 도메인을 입력하시면 됩니다
MyDomain=<자신의 도메인>
MyDomain=gasida.link
echo "export MyDomain=gasida.link" >> /etc/profile

# 자신의 Route 53 도메인 ID 조회 및 변수 지정
aws route53 list-hosted-zones-by-name --dns-name "${MyDomain}." | jq
aws route53 list-hosted-zones-by-name --dns-name "${MyDomain}." --query "HostedZones[0].Name"
aws route53 list-hosted-zones-by-name --dns-name "${MyDomain}." --query "HostedZones[0].Id" --output text
MyDnzHostedZoneId=`aws route53 list-hosted-zones-by-name --dns-name "${MyDomain}." --query "HostedZones[0].Id" --output text`
echo $MyDnzHostedZoneId

# (옵션) NS 레코드 타입 첫번째 조회
aws route53 list-resource-record-sets --output json --hosted-zone-id "${MyDnzHostedZoneId}" --query "ResourceRecordSets[?Type == 'NS']" | jq -r '.[0].ResourceRecords[].Value'
# (옵션) A 레코드 타입 모두 조회
aws route53 list-resource-record-sets --output json --hosted-zone-id "${MyDnzHostedZoneId}" --query "ResourceRecordSets[?Type == 'A']"

# A 레코드 타입 조회
aws route53 list-resource-record-sets --hosted-zone-id "${MyDnzHostedZoneId}" --query "ResourceRecordSets[?Type == 'A']" | jq
aws route53 list-resource-record-sets --hosted-zone-id "${MyDnzHostedZoneId}" --query "ResourceRecordSets[?Type == 'A'].Name" | jq
aws route53 list-resource-record-sets --hosted-zone-id "${MyDnzHostedZoneId}" --query "ResourceRecordSets[?Type == 'A'].Name" --output text

# A 레코드 값 반복 조회
while true; do aws route53 list-resource-record-sets --hosted-zone-id "${MyDnzHostedZoneId}" --query "ResourceRecordSets[?Type == 'A']" | jq ; date ; echo ; sleep 1; done
ExternalDNS 설치 - 링크
# EKS 배포 시 Node IAM Role 설정되어 있음
# eksctl create cluster ... --external-dns-access ...

#
MyDomain=<자신의 도메인>
MyDomain=gasida.link

# 자신의 Route 53 도메인 ID 조회 및 변수 지정
MyDnzHostedZoneId=$(aws route53 list-hosted-zones-by-name --dns-name "${MyDomain}." --query "HostedZones[0].Id" --output text)

# 변수 확인
echo $MyDomain, $MyDnzHostedZoneId

# ExternalDNS 배포
curl -s -O https://raw.githubusercontent.com/gasida/PKOS/main/aews/externaldns.yaml
sed -i "s/0.13.4/0.14.0/g" externaldns.yaml
cat externaldns.yaml | yh
MyDomain=$MyDomain MyDnzHostedZoneId=$MyDnzHostedZoneId envsubst < externaldns.yaml | kubectl apply -f -

# 확인 및 로그 모니터링
kubectl get pod -l app.kubernetes.io/name=external-dns -n kube-system
kubectl logs deploy/external-dns -n kube-system -f
Service(NLB) + 도메인 연동(ExternalDNS) - 도메인체크
DNS Propagation Checker - Global DNS Checker Tool
Instant DNS Propagation Check. Global DNS Propagation Checker - Check DNS records around the world.
www.whatsmydns.net
# 터미널1 (모니터링)
watch -d 'kubectl get pod,svc'
kubectl logs deploy/external-dns -n kube-system -f

# 테트리스 디플로이먼트 배포
cat <<EOF | kubectl create -f -
apiVersion: apps/v1
kind: Deployment
metadata:
  name: tetris
  labels:
    app: tetris
spec:
  replicas: 1
  selector:
    matchLabels:
      app: tetris
  template:
    metadata:
      labels:
        app: tetris
    spec:
      containers:
      - name: tetris
        image: bsord/tetris
---
apiVersion: v1
kind: Service
metadata:
  name: tetris
  annotations:
    service.beta.kubernetes.io/aws-load-balancer-nlb-target-type: ip
    service.beta.kubernetes.io/aws-load-balancer-scheme: internet-facing
    service.beta.kubernetes.io/aws-load-balancer-cross-zone-load-balancing-enabled: "true"
    service.beta.kubernetes.io/aws-load-balancer-backend-protocol: "http"
    #service.beta.kubernetes.io/aws-load-balancer-healthcheck-port: "80"
spec:
  selector:
    app: tetris
  ports:
  - port: 80
    protocol: TCP
    targetPort: 80
  type: LoadBalancer
  loadBalancerClass: service.k8s.aws/nlb
EOF

# 배포 확인
kubectl get deploy,svc,ep tetris

# NLB에 ExternanDNS 로 도메인 연결
kubectl annotate service tetris "external-dns.alpha.kubernetes.io/hostname=tetris.$MyDomain"
while true; do aws route53 list-resource-record-sets --hosted-zone-id "${MyDnzHostedZoneId}" --query "ResourceRecordSets[?Type == 'A']" | jq ; date ; echo ; sleep 1; done

# Route53에 A레코드 확인
aws route53 list-resource-record-sets --hosted-zone-id "${MyDnzHostedZoneId}" --query "ResourceRecordSets[?Type == 'A']" | jq
aws route53 list-resource-record-sets --hosted-zone-id "${MyDnzHostedZoneId}" --query "ResourceRecordSets[?Type == 'A'].Name" | jq .[]

# 확인
dig +short tetris.$MyDomain @8.8.8.8
dig +short tetris.$MyDomain

# 도메인 체크
echo -e "My Domain Checker = https://www.whatsmydns.net/#A/tetris.$MyDomain"

# 웹 접속 주소 확인 및 접속
echo -e "Tetris Game URL = http://tetris.$MyDomain"
확인

Network Policies with VPC CNI
AWS EKS fully supports the upstream Kubernetes Network Policy API, ensuring compatibility and adherence to Kubernetes standards.
동작: eBPF로 패킷 필터링 동작 - Network Policy Controller, Node Agent, eBPF SDK
- 사전 조건 : EKS 1.25 버전 이상, AWS VPC CNI 1.14 이상, OS 커널 5.10 이상 EKS 최적화 AMI(AL2, Bottlerocket, Ubuntu)
- Network Policy Controller : v1.25 EKS 버전 이상 자동 설치, 통제 정책 모니터링 후 eBPF 프로그램을 생성 및 업데이트하도록 Node Agent에 지시
- Node Agent : AWS VPC CNI 번들로 ipamd 플러그인과 함께 설치됨(aws-node 데몬셋). eBPF 프래그램을 관리
- eBPF SDK : AWS VPC CNI에는 노드에서 eBPF 프로그램과 상호 작용할 수 있는 SDK 포함, eBPF 실행의 런타임 검사, 추적 및 분석 가능
사전 준비 및 기본 정보 확인
# Network Policy 기본 비활성화되어 있어, 활성화 필요 : 실습 환경은 미리 활성화 설정 추가되어 있음
tail -n 11 myeks.yaml | yh
addons:
- name: vpc-cni # no version is specified so it deploys the default version
  version: latest # auto discovers the latest available
  attachPolicyARNs:
    - arn:aws:iam::aws:policy/AmazonEKS_CNI_Policy
  configurationValues: |-
    enableNetworkPolicy: "true"

# Node Agent 확인 : AWS VPC CNI 1.14 이상 버전 정보 확인
kubectl get ds aws-node -n kube-system -o yaml | k neat | yh
...
    - args:
      - --enable-ipv6=false
      - --enable-network-policy=true
...
    volumeMounts:
    - mountPath: /host/opt/cni/bin
      name: cni-bin-dir
    - mountPath: /sys/fs/bpf
      name: bpf-pin-path
    - mountPath: /var/log/aws-routed-eni
      name: log-dir
    - mountPath: /var/run/aws-node
      name: run-dir
...


kubectl get ds aws-node -n kube-system -o yaml | grep -i image:
kubectl get pod -n kube-system -l k8s-app=aws-node
kubectl get ds -n kube-system aws-node -o jsonpath='{.spec.template.spec.containers[*].name}{"\n"}'
aws-node aws-eks-nodeagent

# EKS 1.25 버전 이상 확인
kubectl get node

# OS 커널 5.10 이상 확인
ssh ec2-user@$N1 uname -r
5.10.210-201.852.amzn2.x86_64

# 실행 중인 eBPF 프로그램 확인
ssh ec2-user@$N1 sudo /opt/cni/bin/aws-eks-na-cli ebpf progs
Programs currently loaded :
Type : 26 ID : 6 Associated maps count : 1
========================================================================================
Type : 26 ID : 8 Associated maps count : 1
========================================================================================

# 각 노드에 BPF 파일 시스템을 탑재 확인
ssh ec2-user@$N1 mount | grep -i bpf
none on /sys/fs/bpf type bpf (rw,nosuid,nodev,noexec,relatime,mode=700)

ssh ec2-user@$N1 df -a | grep -i bpf
none                   0       0         0    - /sys/fs/bpf
샘플 애플리케이션 배포 및 네트워크 정책 적용 실습 - Link

#
git clone https://github.com/aws-samples/eks-network-policy-examples.git
cd eks-network-policy-examples
tree advanced/manifests/
kubectl apply -f advanced/manifests/

# 확인
kubectl get pod,svc
kubectl get pod,svc -n another-ns

# 통신 확인
kubectl exec -it client-one -- curl demo-app
kubectl exec -it client-two -- curl demo-app
kubectl exec -it another-client-one -n another-ns -- curl demo-app
kubectl exec -it another-client-one -n another-ns -- curl demo-app.default
kubectl exec -it another-client-two -n another-ns -- curl demo-app.default.svc
모든 트래픽 거부
# 모니터링
# kubectl exec -it client-one -- curl demo-app
while true; do kubectl exec -it client-one -- curl --connect-timeout 1 demo-app ; date; sleep 1; done

# 정책 적용
cat advanced/policies/01-deny-all-ingress.yaml | yh
kubectl apply -f advanced/policies/01-deny-all-ingress.yaml
kubectl get networkpolicy

# 정책 다시 삭제
kubectl delete -f advanced/policies/01-deny-all-ingress.yaml

# 다시 적용
kubectl apply -f advanced/policies/01-deny-all-ingress.yaml
확인

여기서 인그레스 밑에 룰이 없는 것을 보면 다 차단 했다는 것을 알 수 있습니다.
정책이 적용 됐을때는 확인이 안 됩니다.

삭제해보면 다시 확인이 가능하네요.

동일 네임스페이스 + 클라이언트1 로부터의 수신 허용
#
cat advanced/policies/03-allow-ingress-from-samens-client-one.yaml | yh
kubectl apply -f advanced/policies/03-allow-ingress-from-samens-client-one.yaml
kubectl get networkpolicy

# 클라이언트2 수신 확인
kubectl exec -it client-two -- curl --connect-timeout 1 demo-app
확인

another-ns 네임스페이스로부터의 수신 허용
# 모니터링
# kubectl exec -it another-client-one -n another-ns -- curl --connect-timeout 1 demo-app.default
while true; do kubectl exec -it another-client-one -n another-ns -- curl --connect-timeout 1 demo-app.default ; date; sleep 1; done

#
cat advanced/policies/04-allow-ingress-from-xns.yaml | yh
kubectl apply -f advanced/policies/04-allow-ingress-from-xns.yaml
kubectl get networkpolicy

#
kubectl exec -it another-client-two -n another-ns -- curl --connect-timeout 1 demo-app.default
확인

eBPF 관련 정보 확인
# 실행 중인 eBPF 프로그램 확인
for i in $N1 $N2 $N3; do echo ">> node $i <<"; ssh ec2-user@$i sudo /opt/cni/bin/aws-eks-na-cli ebpf progs; echo; done

# eBPF 로그 확인
for i in $N1 $N2 $N3; do echo ">> node $i <<"; ssh ec2-user@$i sudo cat /var/log/aws-routed-eni/ebpf-sdk.log; echo; done
for i in $N1 $N2 $N3; do echo ">> node $i <<"; ssh ec2-user@$i sudo cat /var/log/aws-routed-eni/network-policy-agent; echo; done
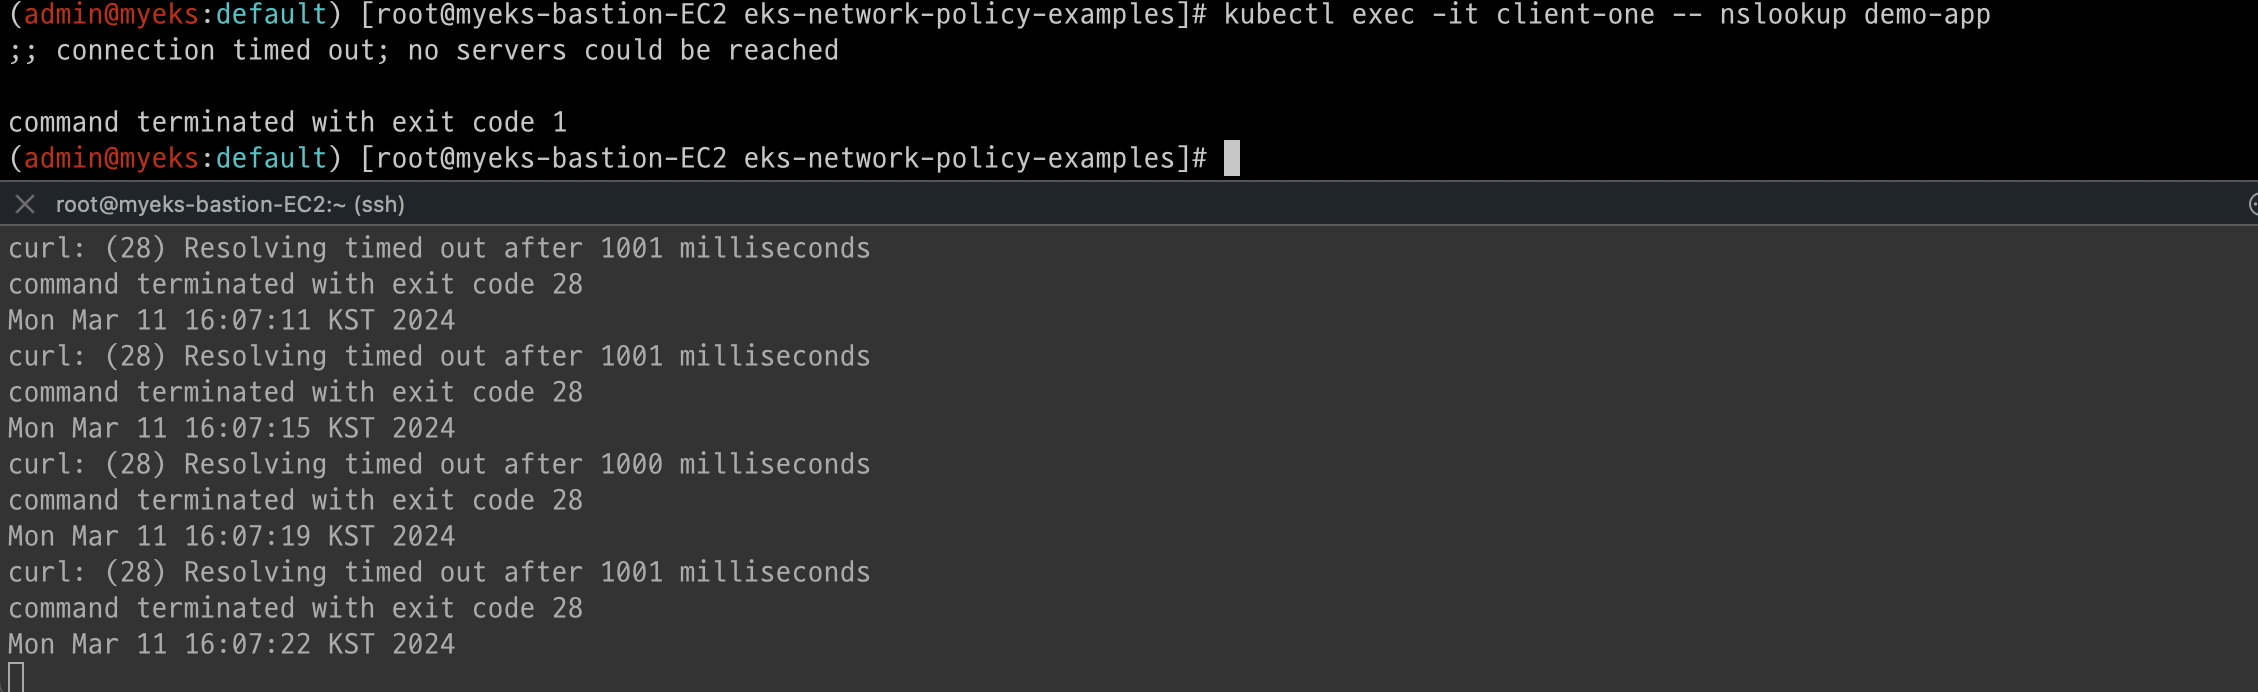
송신 트래픽 거부 : 기본 네임스페이스의 클라이언트-1 포드에서 모든 송신 격리를 적용
# 모니터링
while true; do kubectl exec -it client-one -- curl --connect-timeout 1 google.com ; date; sleep 1; done

#
cat advanced/policies/06-deny-egress-from-client-one.yaml | yh
kubectl apply -f advanced/policies/06-deny-egress-from-client-one.yaml
kubectl get networkpolicy

#
kubectl exec -it client-one -- nslookup demo-app
확인
송신 트래픽 허용 : DNS 트래픽을 포함하여 여러 포트 및 네임스페이스에서의 송신을 허용
# 모니터링
while true; do kubectl exec -it client-one -- curl --connect-timeout 1 demo-app ; date; sleep 1; done

#
cat advanced/policies/08-allow-egress-to-demo-app.yaml | yh
kubectl apply -f advanced/policies/08-allow-egress-to-demo-app.yaml
kubectl get networkpolicy
확인

실습 후 리소스 삭제
kubectl delete networkpolicy --all
kubectl delete -f advanced/manifests/
실습자원 삭제
eksctl delete cluster --name $CLUSTER_NAME && aws cloudformation delete-stack --stack-name $CLUSTER_NAME'study > AEWS 2기' 카테고리의 다른 글
| AEWS 2기 4주차 두번째 (0) | 2024.03.30 |
|---|---|
| AEWS 2기 4주차 첫번째 (0) | 2024.03.25 |
| AEWS 2기 3주차 (0) | 2024.03.22 |
| AEWS 2기 2주차 첫번째 (0) | 2024.03.22 |
| AEWS 2기 1주차 (0) | 2024.03.04 |


